How to fix "Windows Was Unable to Complete the Formatting of USB Pen Drive"
So you want to know how to fix the error message “Windows Was Unable to Complete the Formatting of USB Pen Drive.” This is a common issue, and I will guide you through the steps to resolve the problem with your USB flash drive. There are various reasons why you might encounter difficulties formatting a USB drive in both Windows 10 and Windows 11. The issue could be attributed to a faulty USB drive, the presence of malware, or the fact that the USB drive is in a RAW or corrupt state.
Possible Causes
To begin resolving this USB problem, let’s explore the possible causes. Firstly, a faulty USB drive may result in formatting errors. Check for physical damage, such as bent or broken connectors, and try using a different USB port or cable. If the issue persists, you may want to consider using a different USB drive to see if the problem is specific to the hardware.
Malware can also hinder the formatting process. Ensure that your computer is equipped with reliable antivirus software and perform a thorough scan of both the USB drive and your system. Remove any detected malware or threats, and attempt the formatting process again.
Another common reason for formatting issues is when the USB drive is in a RAW or corrupt state. In such cases, Windows may struggle to complete the formatting successfully. To address this, we will walk through a step-by-step guide to bring your USB drive back to a usable state.
Follow these steps diligently, and you’ll likely find a resolution to your USB formatting problem. By the end of this guide, you’ll have a properly formatted USB drive that is free from errors and ready for use. Let’s dive into the troubleshooting process and get your USB drive back on track.”
Steps 1 Through 5
1. Open Command Prompt and run as Administrator
To initiate the troubleshooting process, begin by opening the Command Prompt with administrative privileges. This can be done by right-clicking on the Start menu, selecting ‘Command Prompt (Admin),’ or ‘Windows PowerShell (Admin),’ depending on your Windows version.
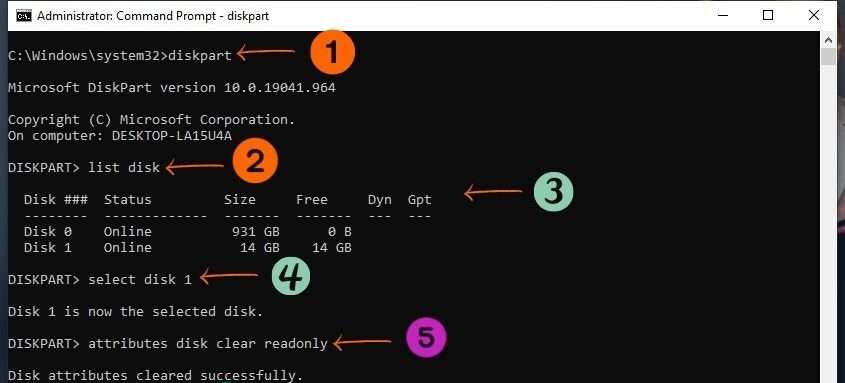
2. Type: "diskpart" in the command prompt window
To initiate the troubleshooting process, begin by opening the Command Prompt with administrative privileges. This can be done by right-clicking on the Start menu, selecting ‘Command Prompt (Admin),’ or ‘Windows PowerShell (Admin),’ depending on your Windows version.
3. Next type: "list disk"
Following the ‘diskpart’ command, type ‘list disk’ in the command prompt window. This command will display a list of all the connected disks on your computer, including your USB drive. This step is crucial for identifying and selecting the correct disk that corresponds to your USB drive.
4. Now, select the correct disk by typing: "select disk 2" (replace 2 with your drive number)
Once you have identified the appropriate disk for your USB drive in the previous step, proceed to select it by entering the command ‘select disk’ followed by the corresponding drive number (for example, ‘select disk 2’). This ensures that the subsequent commands will be applied to the correct USB drive.
5. Now type: "attributes disk clear readonly"
After selecting the correct disk, it’s important to clear any read-only attributes that may be hindering the formatting process. Enter the command ‘attributes disk clear readonly’ to remove any restrictions on writing to the disk.
Steps 6 Through 8
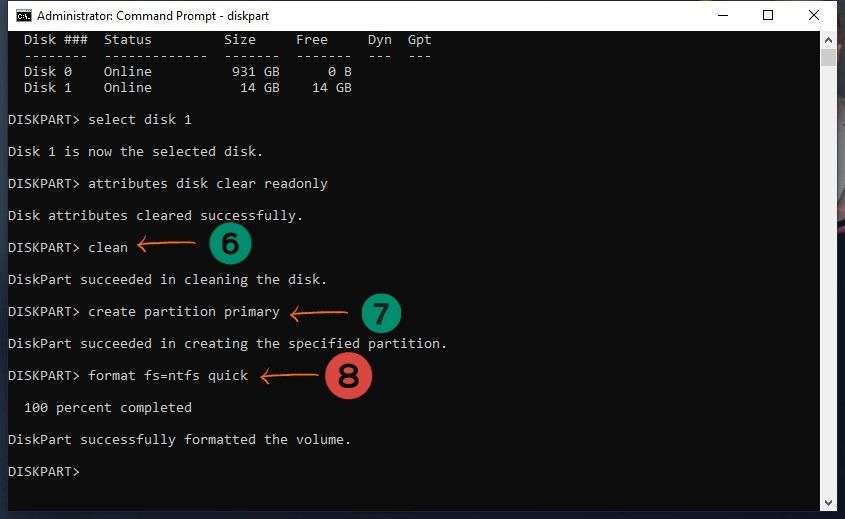
6. Next type: "clean"
The ‘clean’ command is used to remove all partitions and data from the selected disk, preparing it for a fresh formatting. This step is crucial for resolving issues related to corrupted or problematic partitions on the USB drive.
7. Now we need to type: "create partition primary"
With the disk cleaned, proceed to create a new primary partition using the command ‘create partition primary.’ This step ensures that the USB drive is properly partitioned and ready for the formatting process.
8. Then type: "format fs=ntfs quick"
Choose the desired file system for your USB drive by entering either ‘format fs=ntfs quick’ or ‘format fs=fat32 quick.’ The ‘quick’ option performs a faster format, expediting the process while still ensuring the drive is formatted correctly.
9. Type "exit"
Finally, exit the DiskPart utility by typing ‘exit.’ This concludes the series of commands, and your USB drive should now be successfully formatted and ready for use.
By breaking down the troubleshooting steps into these clear paragraphs, you can easily follow the guide and navigate through the commands to address the formatting problem effectively.